
Camera guide · Reolink
Reolink plate recognition on the camera you already have
Reolink cameras record the car. ANPR Edge reads it — plate, make, model and colour, from all six GCC countries — on a Windows PC or Mac next to the camera. No special ANPR camera to buy.
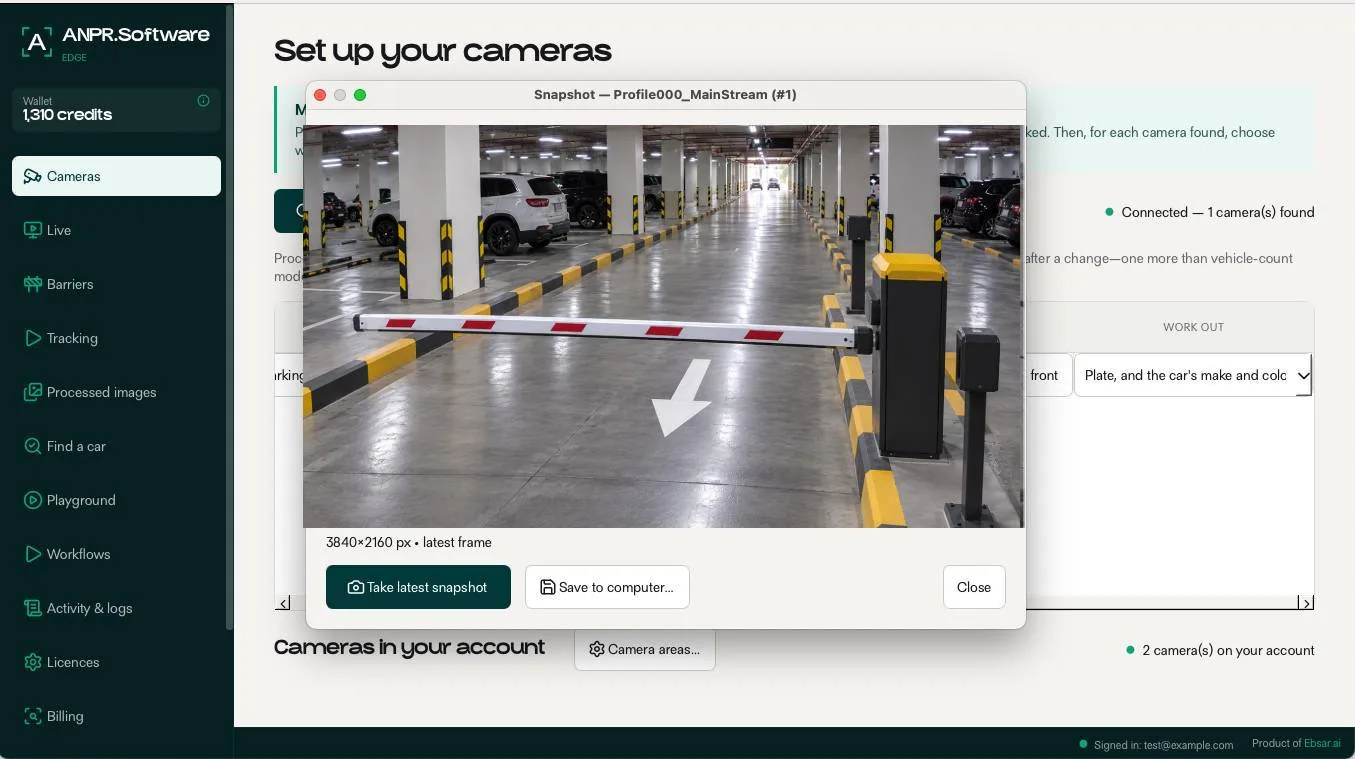
What your Reolink camera can do with ANPR Edge
Read every plate
Plates from the UAE, Saudi Arabia, Qatar, Kuwait, Bahrain and Oman, read from the Reolink stream on your PC or in our cloud.
Know the car, not just the plate
Make, model and colour come with each read, so you can search for a white Land Cruiser as easily as for a plate.
Open the gate for approved cars
Check each plate against your list and open the barrier through a relay board. The camera only has to see.
Alerts, counts and search
Get a Telegram or email alert for a watched car, count cars in and out, and find any car by plate.
What you need
- A wired Reolink camera that offers RTSP and ONVIF — most of Reolink’s PoE range. Battery-powered models do not offer these streams. This guide was set up with an RLC-811A.
- Power for the camera: a PoE switch, a PoE injector or its own adapter, and a network cable to the PC.
- A Windows PC or Mac on the same network as the camera.
- The Reolink app on that PC, used once to switch on the camera’s streams.
- A free ANPR.software account.
Set it up, step by step
Before you start
Step 1
Install the Reolink app on your PC
Download the Reolink app (Reolink Client) for Windows or Mac from Reolink’s website. You use it once, to switch on the camera’s streams.
Step 2
Install ANPR Edge
Download ANPR Edge for Windows or Mac and install it on the same PC.
Download ANPR EdgeStep 3
Plug the camera in and wait
Connect the camera to the PC with a network cable and make sure it has power. A Reolink camera takes 5 to 10 minutes to wake up after it is powered — wait before the next step.
Find the camera
Step 4
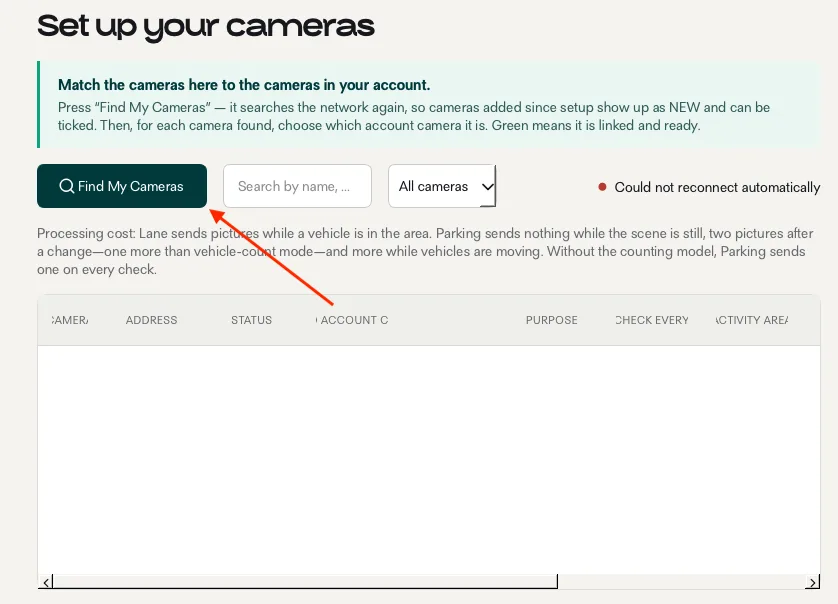
Sign in and press Find My Cameras
Open ANPR Edge, sign in or create a free account, and on the Cameras screen press Find My Cameras.
Step 5
Let ANPR Edge give the camera an address
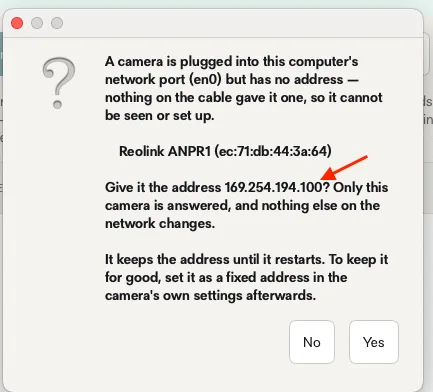
If the camera is the only device on the cable, ANPR Edge notices it has no address and offers one — press Yes. If there is a switch or an NVR in between, there is no popup: ANPR Edge lists the camera addresses it finds instead.
Step 6
Copy the camera’s address
Note the address ANPR Edge shows, for example 169.254.194.100. It lasts until the camera restarts, so once everything works, set it as a fixed address in the camera’s own network settings.
Switch on ONVIF and RTSP in the Reolink app
Reolink cameras arrive with ONVIF switched off, and ANPR Edge needs it to find and read the camera.
Step 7
Add the camera in the Reolink app
In the Reolink app, press the plus icon next to Device and choose IP/Domain.
Step 8
Enter the address and set a password
Enter the address you copied from ANPR Edge and follow the prompts to set the camera’s password. Keep it — ANPR Edge asks for it later.
Step 9
Open the camera’s settings
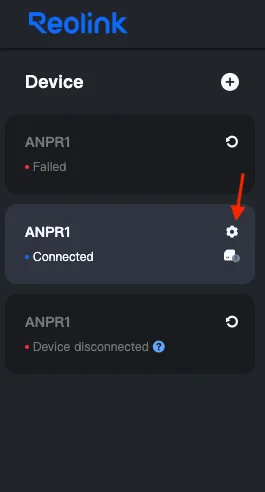
In the Device list, press the gear icon on the camera.
Step 10
Go to Network, then Advanced
Open Network in the left menu, then Advanced.
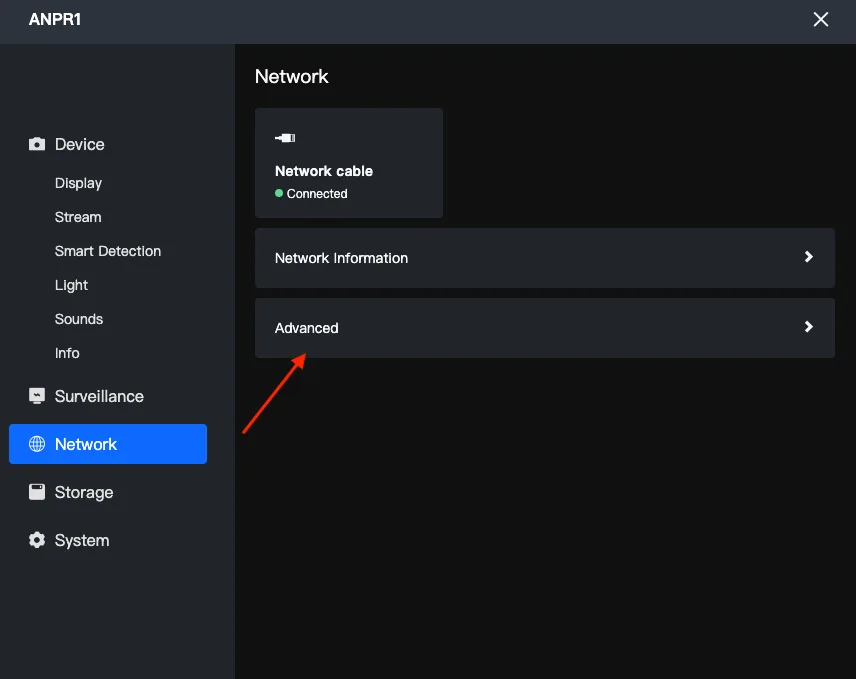
Step 11
Open Server Settings
In Advanced, open Server Settings.
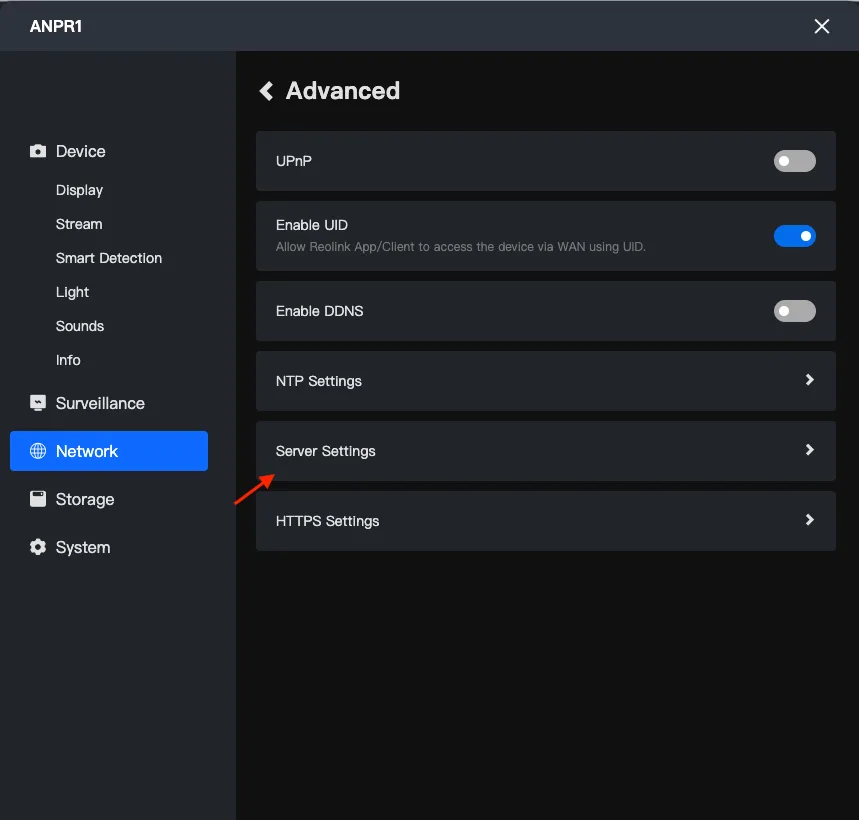
Step 12
Turn on HTTP, RTSP and ONVIF
Tick HTTP, RTSP and ONVIF and press Save. ONVIF needs RTSP on first. Reolink serves ONVIF on port 8000.
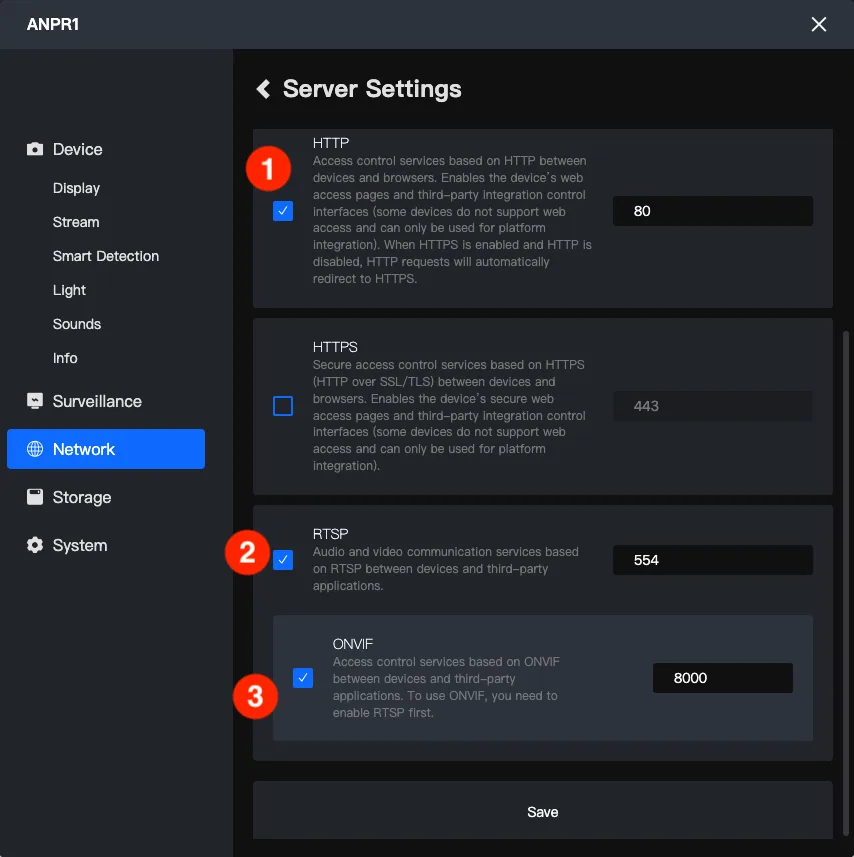
Connect it in ANPR Edge
Step 13
Choose the camera in ANPR Edge
Back in ANPR Edge, tick the camera’s address, enter the camera’s username (admin) and the password you just set — this is the camera’s login, not your ANPR.software account — and press Connect Selected.
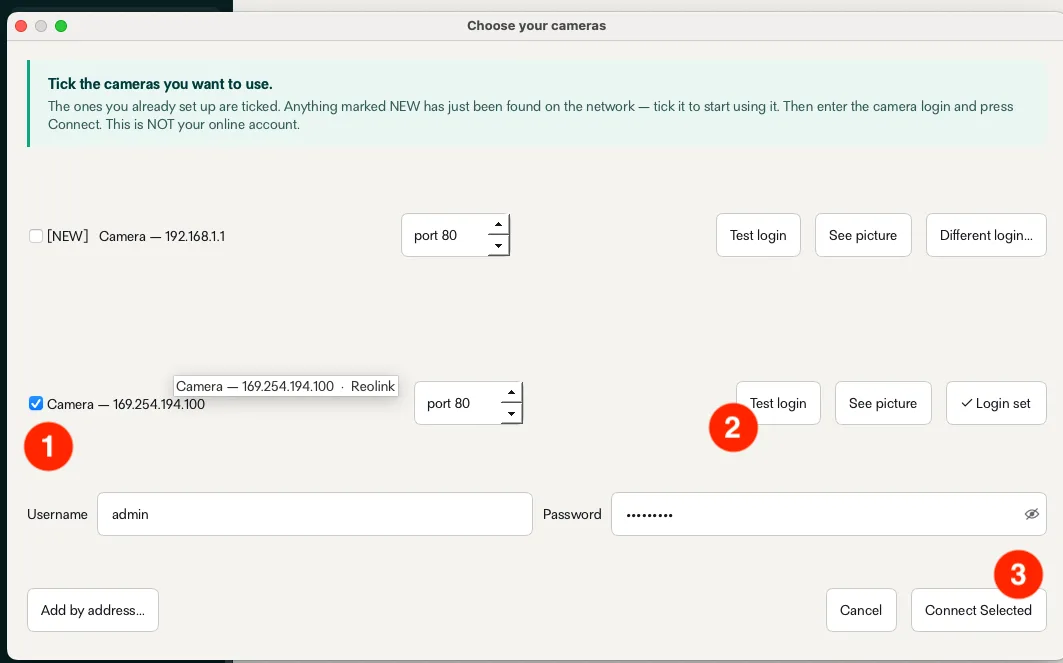
Step 14
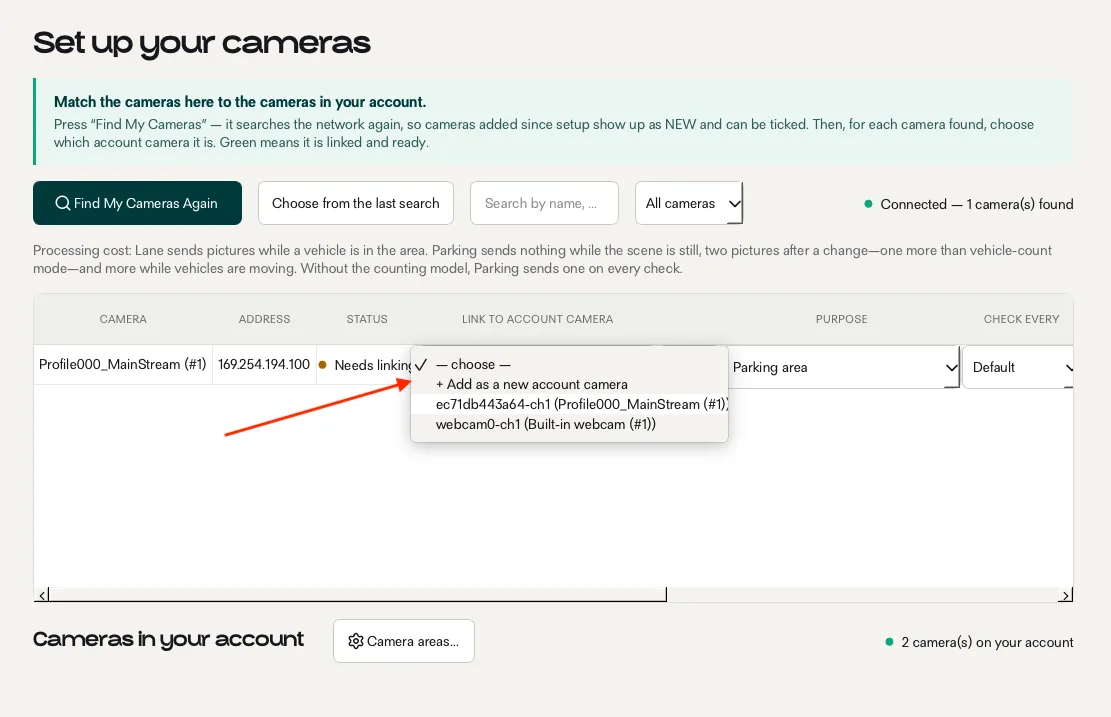
Link it to a camera in your account
The camera now appears in the list. Under Link to account camera, pick the camera you created before, or add it as a new one.
Step 15
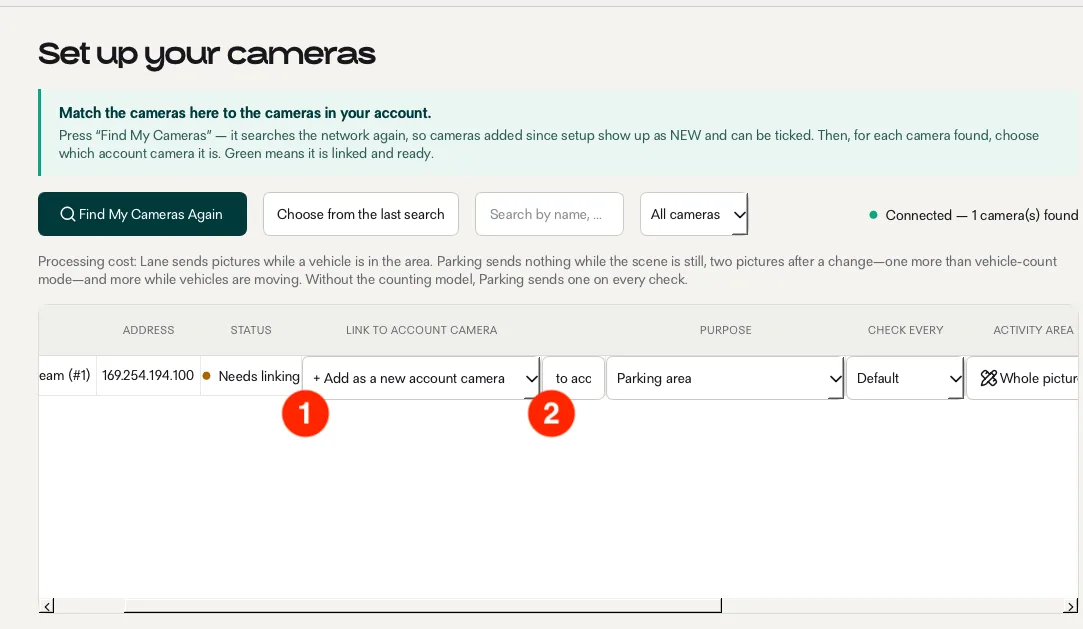
Adding it as a new camera
For a new camera, choose + Add as a new account camera and press the button that appears beside it.
Step 16
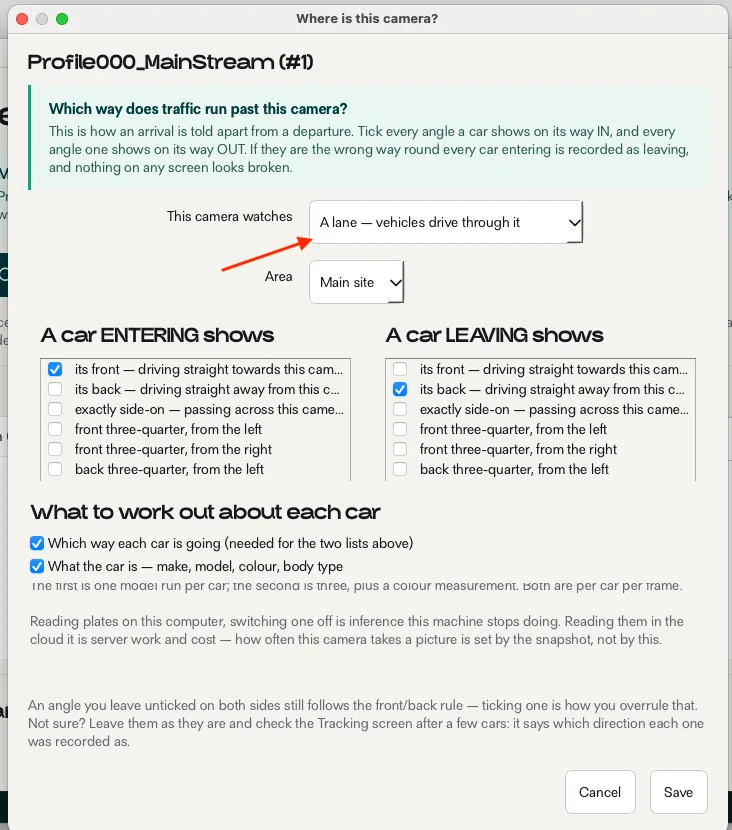
Say where the camera is
Under This camera watches, choose A lane if cars drive past it — an entrance, an exit or a road — or A parking area if cars park and stay. For a lane, tick how a car looks to the camera when it is ENTERING (its front, its back, side-on…) and when it is LEAVING, so an arrival is never recorded as a departure. Press Save.
Step 17
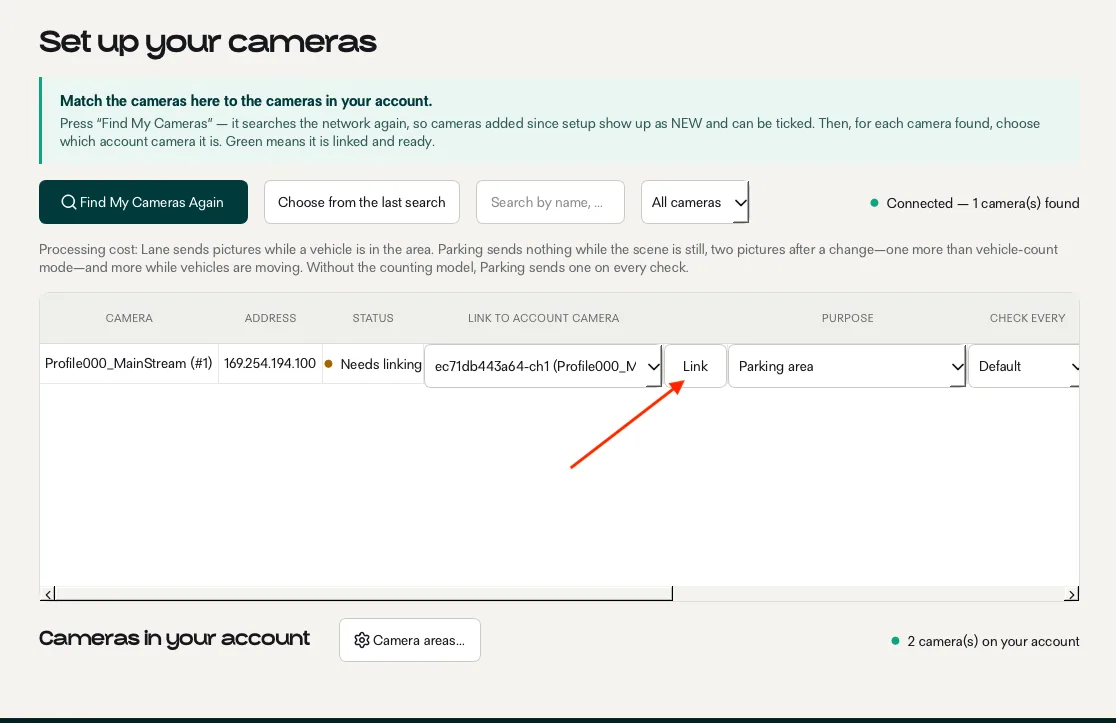
The camera is connected
The camera is linked and ready. Green means connected.
Tell it where to look and what to read
Step 18
Draw the area to watch
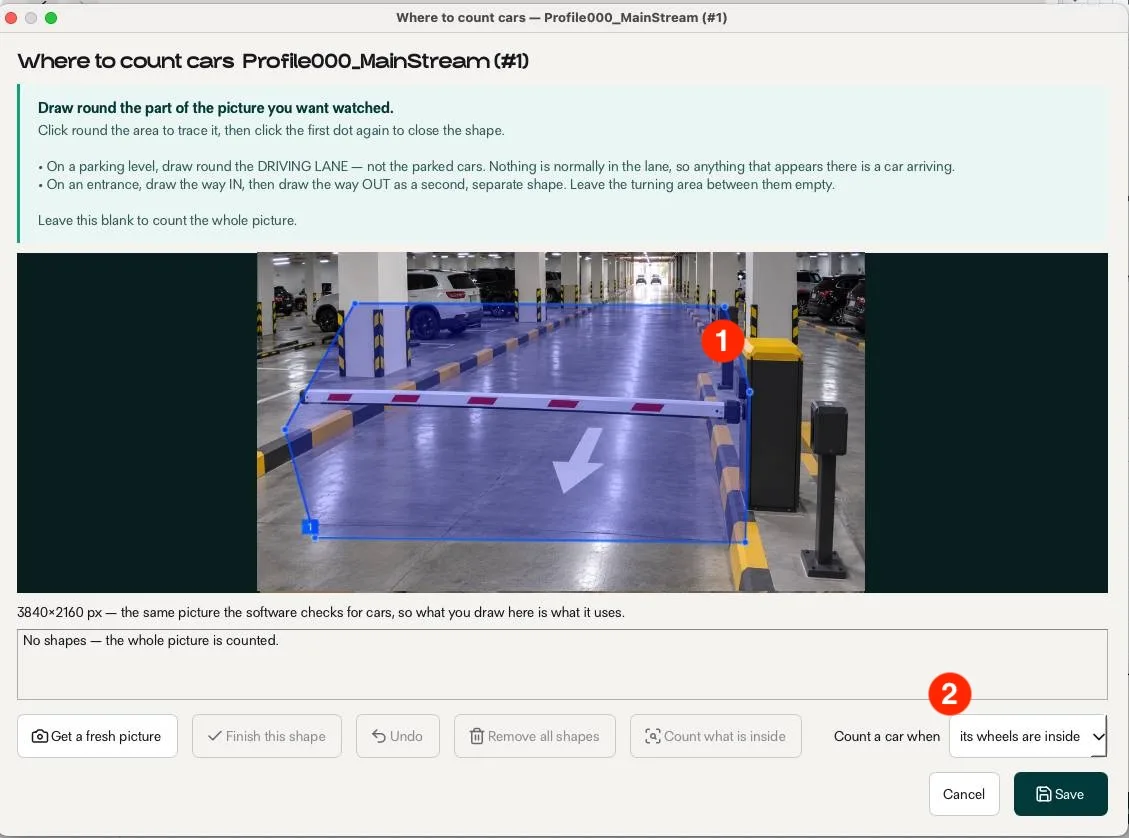
Scroll right to Activity area and draw round the part of the picture to watch — the lane, not the whole scene — so passing traffic and parked cars outside it are ignored. Then choose, at the bottom right, when a car counts as inside the area.
Step 19
Choose what to read
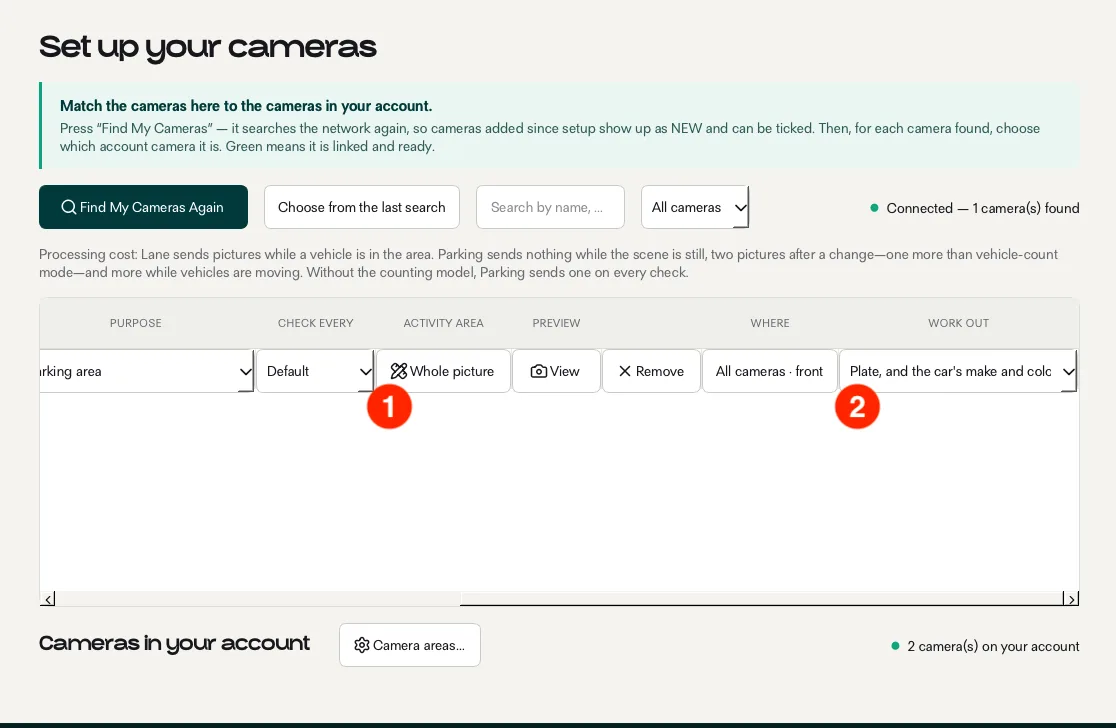
In the Work out column, choose the plate only — faster and lighter on the PC — or the plate with the car’s make, model and colour.
Start reading plates
Step 20
Start tracking
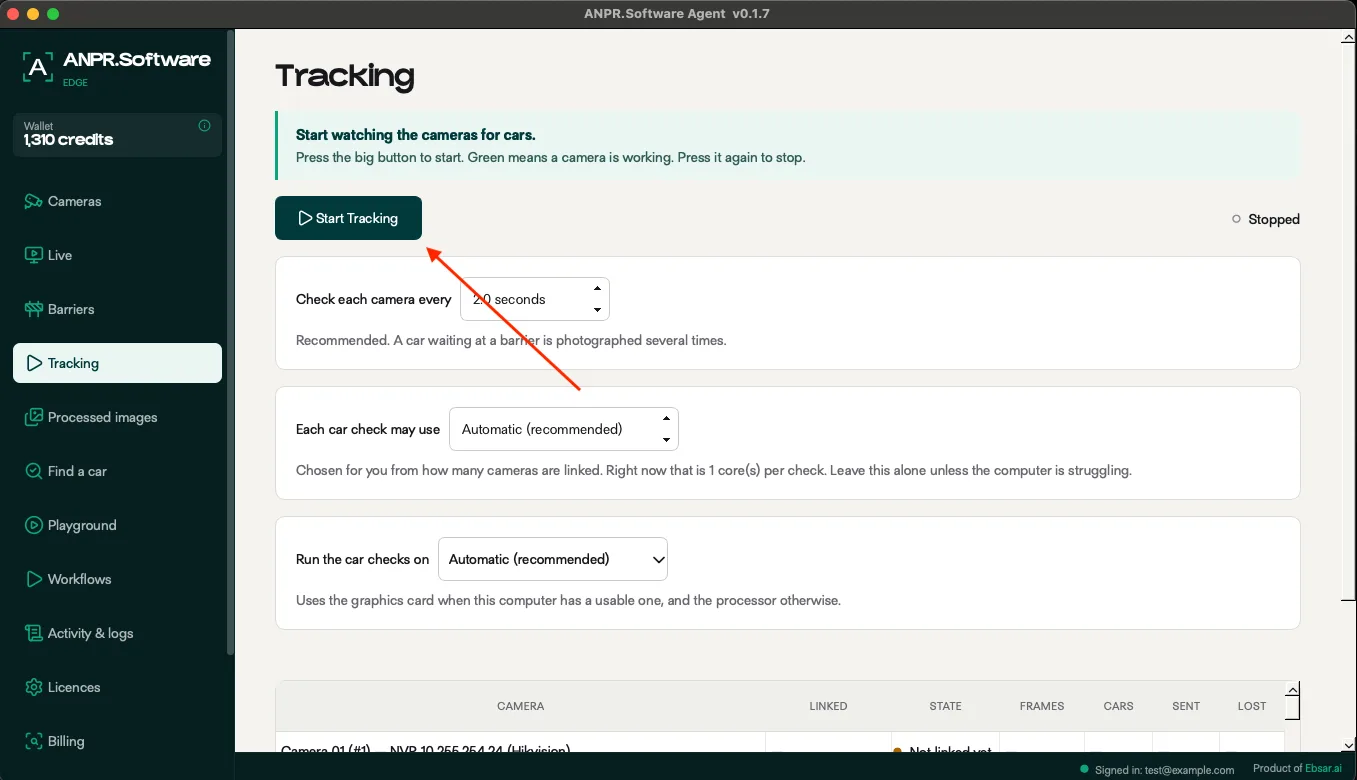
Open Tracking and press Start Tracking. ANPR Edge starts watching the camera and reading plates. Green means a camera is working; press the button again to stop.
Step 21
Send the plates where you need them
On the Workflows page, decide what happens after a plate is read: send it to your own system over HTTP, add it to a Google Sheet, or message a private Telegram chat. The decisions run on your PC, so a gate never waits for the internet.
How workflows work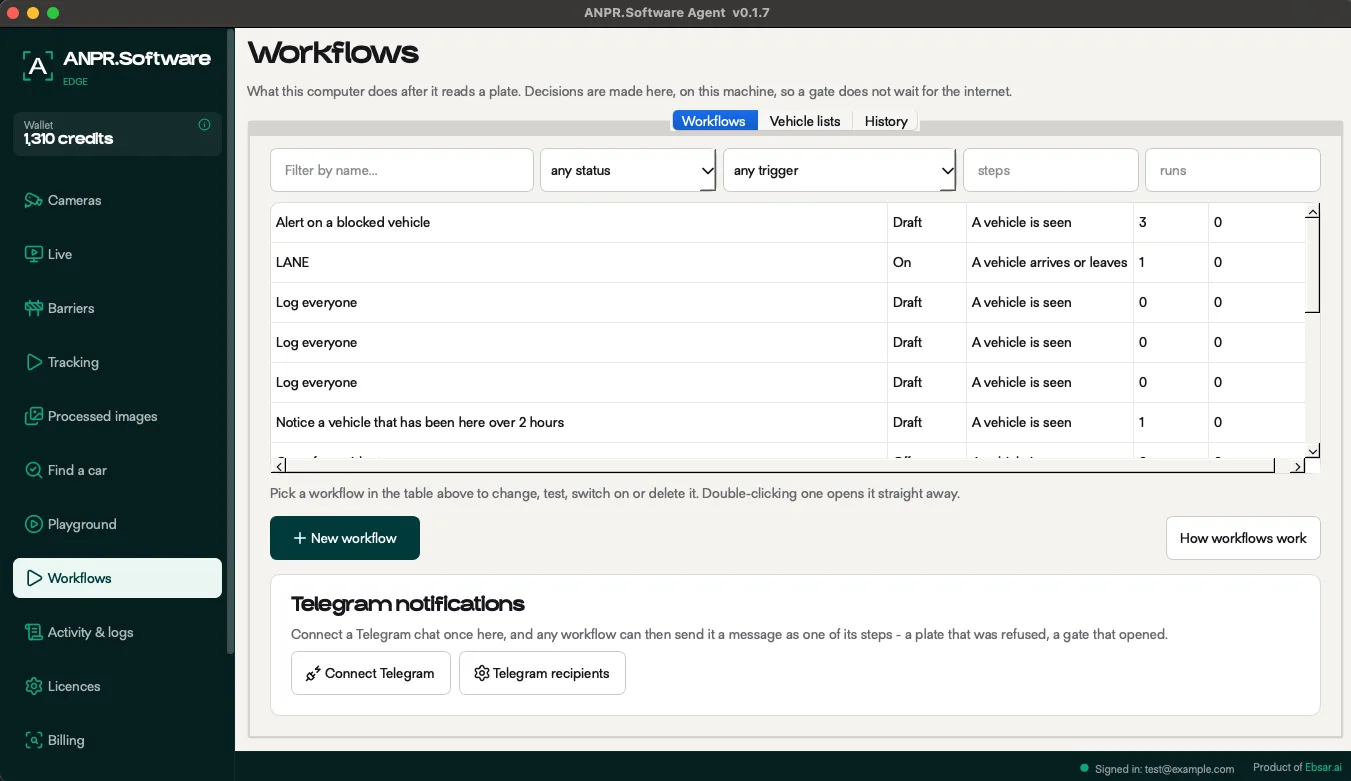
Step 22
Check what was read
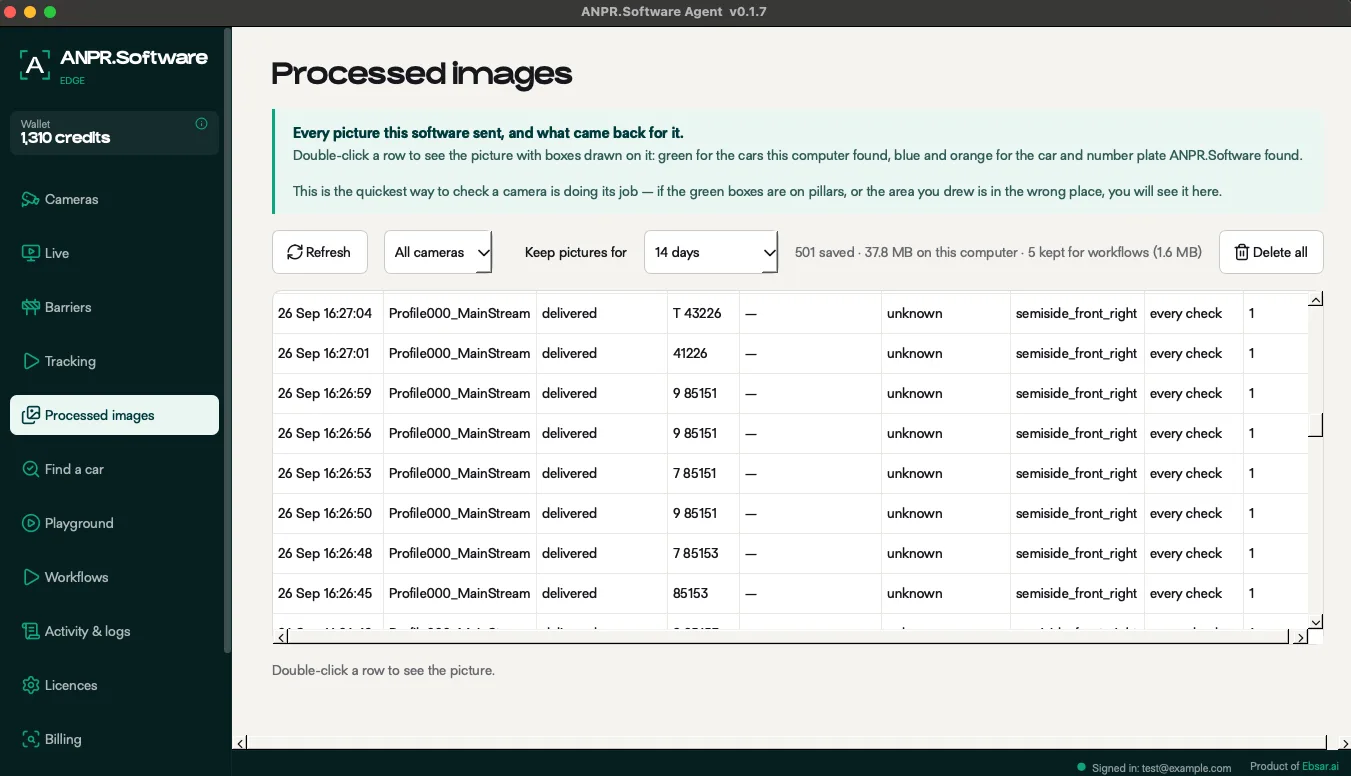
The Processed images page lists every picture and what came back for it. Double-click a row to see it with the car and plate boxed — the quickest way to check the camera and the area you drew.
If something does not show up
- Nothing found: wait the full 5 to 10 minutes after powering the camera, then press Find My Cameras again.
- The camera connected once and then vanished: its address ended at the restart. Set a fixed address in the camera’s network settings and connect to that.
- The camera appears but will not connect: check that ONVIF is ticked in Server Settings — it only switches on once RTSP is on — and that the login is the camera’s, not your account’s.
- The camera is plugged into an NVR’s own ports and does not appear: connect it to a switch on the same network as the PC instead, so ANPR Edge can reach it.
- Arrivals show as departures: open Where is this camera? and swap the ENTERING and LEAVING angles.
Questions
Can a Reolink camera read license plates?
Reolink cameras record the scene and can detect people and vehicles. ANPR Edge adds the part that reads the plate text: it takes the camera’s stream and returns the plate, the country and the car’s make, model and colour.
Which Reolink cameras work?
Wired models that offer RTSP and ONVIF, which is most of Reolink’s PoE range. This guide was set up with an RLC-811A. Battery-powered Reolink cameras do not offer these streams.
Why do I have to turn on ONVIF?
Reolink ships its cameras with ONVIF switched off. ANPR Edge uses ONVIF and RTSP to find the camera and read its picture, so both have to be on.
Do I need a special ANPR camera?
No. A Reolink camera placed to see the plate clearly is enough; ANPR Edge does the reading. Where you mount it matters more than the model — the camera guide covers the angles and distances.
How much does it cost?
You can start free with one camera, with plates read in our cloud and paid per read. When you grow, one license per location covers the cameras there, with no per-camera fee.
Read plates on the camera you already own
Start free with one camera. When you grow, one license per location covers the cameras there — no per-camera fee.